Sunday, September 14, 2008

ROASTED FIVE ONION SOUP

Onion soup is one of those soups that most people like. I have served it as a soup of the day in many restaurants and have found it to be a good seller, and while there are as many different variation as there are chefs, I like a nice roasted onion soup the best. And the good news is that it's easy to make.

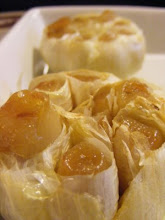
I like to use a variety of onions to make this soup. Here I have red onion, white onion, yellow onion shallot and garlic. The ratio of the mix isn't that important really, just as long as the majority isn't garlic. If it was, you would be making roasted garlic soup - which is fine - but it isn't what I have set out to do here, so keep that in mind!

Toss the mixed onions in a bit of olive oil and roast them in a pan in the oven at 375 degrees until golden brown.

Place the roasted onions in a sauce pot, add some chicken stock, sliced potato, thyme, white wine, white wine vinegar sugar and salt. Bring to a simmer and cook until potatoes are soft.


Transfer everything over to a blender and puree until smooth.


Return soup to the pot and bring back to a simmer. Season with salt, pepper and sherry to taste. Add a little more vinegar if desired also.


Stir until mixed thoroughly and serve. This soup is great with blue cheese croutons and some cold white wine!

Wednesday, September 10, 2008

CHOCOLATE CHIP COOKIES - THE NEIMAN MARCUS URBAN LEGEND

I remember when I first got a computer and signed onto the Internet. I knew absolutely nothing about surfing the Net or emailing at all, but at the same time, I needed a quick education because I was writing a weekly cooking column for "The Voice" and had to submit my columns by email. Wow...that seems like a million years ago!

It wasn't long after first logging on that I began to receive junk emails. One of the first was an email that was circulating that had a chocolate chip cookie recipe attached. The story was that the author of the email had gone into Neiman Marcus to have a coffee and a couple of chocolate chip cookies. He was so impressed with the cookies that he asked for the recipe when he went to the cashier to pay. Apparently, the cashier told him it would cost him "two-fifty" for the recipe to which he agreed and the fee was added to his credit card.

The story then told how the credit card statement arrived the following month and he was dinged two hundred and fifty dollars for the recipe rather than the two dollars and fifty cents he thought he was going to be charged. Apparently he called Neiman Marcus to negotiate the bill and was told there would be no price reduction.

That's where things got nasty.

The perturbed patron decided to write out the recipe - and the story - and sent it out over the Internet. Everyone who received the recipe forwarded it to two friends...and so on...and so on... and so on. Needless to say, it went everywhere!

Anyway, I have since learned that this is an Urban Myth and that it never actually happened. Perhaps not, but it was a pretty good story and it showed a lot of us that the Internet could be used in a bad way.

I've held on to this recipe for about twelve years but have never made it because I already have a great recipe I absolutely love. The other day I decided to have a "bake-a-thon" so I could stockpile some goodies for when my kiddies come to stay with me and I thought I would give the "Neiman Marcus" cookies a try. I wanted to compare it to the chocolate chip cookie recipe I have used for years.

This is a good cookie recipe, but I found that balling it out as recommended in the recipe was a bad idea; the cookies didn't flatten out and remained half domed in shape. Not a desirable shape for a cookie in my opinion! I decided to roll the dough into logs (my preferred method), chilled it and then cut off pucks before baking. I also dropped the baking temperature for a longer, slower baking time. I tend to do that with most cookies.

Here's the recipe:

Ingredients:

2 cups butter
2 cups sugar
2 cups brown sugar

4 eggs
2 tsp vanilla extract

4 cups flour
2 tsp baking powder
2 tsp baking soda
1 tsp salt

5 cups blended oatmeal*

1 8 ounce Hershey bar (grated)
24 ounces chocolate chips
3 cups chopped nuts (your choice)

Method:

  • Measure oatmeal and blend in a blender to a fine powder. *Note: Measure 5 cups of blended oatmeal after blending to a powder. Do not measure 5 cups of oats and then blend to a powder. There is a definite difference in volume!
  • Cream butter and both sugars until light and fluffy.
  • Add eggs and vanilla extract to creamed sugars. Mix thoroughly.
  • Combine flour, baking powder, baking soda and salt thoroughly.
  • Add blended oatmeal to dry ingredients above and mix thoroughly.
  • Add creamed sugars to the dry ingredients above and mix thoroughly.
  • Add chocolate chips, chopped nuts and grated chocolate to the mixture above.
  • Roll into balls and place 2 inches apart on a cookie sheet. Bake for 10 minutes @ 375 degrees.
Well...that's the original recipe, but I made a couple of changes as stated above. I baked my cookies @ 325 degrees for about 15 minutes and I cut them into pucks from a log shaped roll that I chilled in the fridge for a while.

Here are all of the juicy ingredients. Oooh, look at that chocolate!


Here the oats are poured into the blender and are buzzed up to a powder. Be sure to add a little at a time otherwise you won't be able to blend all of the oats fine enough all at once!!

Voila - the blended oatmeal. Now I measured 5 cups as required!


Here's an action shot of Lola chopping pecans for the cookies. Please pay no mind to her index finger pointed along the back of the knife. Sheesh...I still have work to do!


Creaming the butter....

...adding the sugars...

..."whip it good!"


Add the eggs and vanilla extract.


Combine all dry ingredients except the oats.


Add the oats and blend thoroughly.


Add the chocolate and the nuts.


Mix well.


Add the wet to the dry.


Mix thoroughly!


Roll the dough into logs, wrap and chill for about an hour.


Cut the dough into 3/4 inch pucks and bake @ 325 for about 15 minutes. Because all ovens heat differently, please check your first batch at about the 10 minute mark and determine your baking tome. Remember to bake cookies in the middle rack of the oven. Remember also that you can always bake them longer...but you can never unbake them.


Cookies should be moist and chewy and golden on the bottom - not brown or black!


As mentioned...a slower heat and a bit of patience...


...makes for a pretty nice cookie!!

I recommend this recipe with the modifications I have made. Balling the cookie out results in a dome shaped cookie. This is due to the fact that there is a high ratio of dry ingredients to fat. Pucking them out as I did results in a flat cookie that is still moist and chewy.

If you want to see how I roll out cookie dough into logs to make cookie production easier, follow this link: http://livingstoncooks.blogspot.com/2007/10/whos-your-daddy.html.

You will also see a great recipe for the chewiest sugar cookies ever being made by my children.


Tuesday, September 9, 2008

COUNTRY CORN BREAD


This is a recipe for cornbread that we used at The Caledon Inn when I worked there many years ago. We used this bread as the base for Eggs Benedict rather than the traditional English muffin. "Eggs Caledon" was the house Eggs Benny and it consisted of a grilled cornbread base, grilled peameal bacon, grilled asparagus, a poached egg and Sauce Hollandaise. It was a perfect dish because the saltiness of the bacon was countered by the sweetness of the bread and the zest of the hollandaise.

At that time in my cooking career (I was just starting out) I was in charge of baking the cornbread every Sunday morning for brunch. I had a strung baking ability and the chef put me in charge of that task. I don't think he really enjoyed baking anyway. Anyway...I have always loved this cornbread and I make it often at home. It is great as is or garnished with diced red pepper and Jalapeno.

Here are the ingredients. Notice the buttermilk in the background. Buttermilk is used to add flavor and, more importantly, moisture to baked goods. Cornbread can tend to be a bit on the dry side (who are we kidding...it can choke a horse) and the buttermilk adds plenty of moisture to this recipe.

The cornmeal is allowed to soak in the buttermilk for about 15 minutes. This allows the cornmeal to soften.

The dry ingredients are combined...

...and mixed thoroughly.


The eggs are added and mixed in thoroughly.


The melted butter is added and stirred in thoroughly.


The batter is poured into greased and floured loaf pans and the loafs are baked at 325 for an hour.


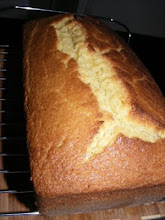
And presto! The loafs are ready!


There's a nice, golden loaf hot out of the oven and all it needs is to be sliced and slathered with sweet butter! Ooooh yeah!


Cornmeal Bread (yields 3 loafs)

Ingredients:

4 cups cornmeal
4 cups buttermilk

6 3/4 cups all purpose flour
3 cups granulated sugar
1 1/2 Tbsp baking powder
2 1/4 tsp baking soda
1 tsp salt
9 eggs
2 1/4 cups butter

Method:

  • Preheat oven to 325 degrees. Grease and flour 3 loaf mans and set aside until needed.
  • Combine cornmeal and buttermilk in a large bowl and let set for 15 minutes.
  • Combine flour, sugar, baking powder, baking soda and salt in a large bowl. Mix well.
  • Melt butter in microwave or on stove top and set aside until needed.
  • Pour cornmeal/buttermilk mixture into the large bowl with the combined dry ingredients. Stir well until thoroughly combined.
  • Add eggs and mix thoroughly
  • Add melted butter and mix thoroughly.
  • Divide batter in equal amounts into loaf pans
  • Place loaf pans on middle rack of oven and bake for approximately one hour. After one hour, test doneness with a wooden skewer by inserting it into the center of one loaf. If skewer comes out wet, bake longer and test again until the skewer comes out dry.
  • Allow to partially cool before eating.

Monday, September 1, 2008

GAZPACHO SHOOTERS

Super quick and easy Gazpacho shooters are a great treat to serve for gatherings where you are serving hors douvres and nibblers. I was roasting some peppers for another dish and decided to add the juices left in the roasting pan into the Gazpacho.

I just added the ingredients straight into this Mexican pitcher and chilled it down in the fridge. One dish cooking at its best!


First I add in the pepper juices.


Then prepare the rest of the ingredients. I used tomato, scallion, cucumber,roasted red pepper, garlic, shallot, V8 Juice, olive oil, white balsamic vinegar, cumin, lime juice, cilantro, sea salt and fresh cracked pepper.

Here I show the finely diced tomato, cucumber, roasted red pepper and scallion.

Add all of the ingredients into the pitcher and chill. It's that easy!


Serve in shooter glasses with a little sour cream, lime wedged and chopped chives. Slam dunk...it was a hit!


Gaspacho is a great vegetarian option for your guests and can be spiked with a drizzle of Tequilla, Vodka or Gin to make it a bit more sassy!