Sunday, September 30, 2007
A BUTCHER, A TAKER, A PRODUCE SHOP MAKER
This is a bit of a tribute to two local business I like to support when shopping for the highest quality ingredients for my cooking adventures. In this story there is a butcher, a produce shop and me...the taker!
Tony's Meats Ltd., located at1848 Main Street in Penticton, is without a doubt the best place to go for meat. He runs a tight little butcher shop and stocks the highest quality fresh cut meats, marinated house specialties and a wide selection of frozen product as well. His staff are always friendly, professional and ready to help with any special requests.
I have used Tony's meats for cooking on this blog, serving guests and for serving at banquets. I have always been impressed with his shop and highly recommend it as a source for the center of the plate!
http://foodpages.ca/TonysMeats
Quality Greens Farm Marget is a local produce market that stocks the highest quality fresh local produce. They sell everything that grows in the field or the orchard and focus on local suppliers for in-season produce.
I have found that they stock many gourmet items that are difficult to find anywhere else locally. They are located at 2100 Main Street in Penticton. They even post thier weekly specials on line!
http://www.qualitygreens.com/
Saturday, September 29, 2007
ONE PAN COOKING
Here is a simple one pan dish that you can leisurely cook in about an hour if you're organized, and about an hour and a half if you aren't. What you want to be sure to do, however, is pour yourself a nice glass of wine, turn up the music, and enjoy the experience either way!
In order to make this dish, you will need two chicken breasts that are both skinless and boneless. I opted for bone in/skin on so I could bone them myself and use the bones for my stock.
I removed the wings, the rib bones, keel bone and shoulder bones. These were used along with some aromatics to make a pan stock. The aromatics were leek, onion, carrot, garlic, parsley stems and peppercorns.
These ingredients as they are can build a flavorful stock. They are used this way to make what is known as a blond stock. If these ingredients are roasted in the oven until browned first, the stock they produce is known as a brown stock. This is because the stock takes on a darker color due to the caramelization of the bones during roasting. But for our purpose, a blond stock will do.
As you can see, cleaning my own breasts yielded me the two breasts, two tenders and a pile of bones. The cost was less than buying two clean breasts. I paid less and got more. This is because I have to do the work of cleaning them myself.
The bones and the aromatics go into the pan with 4 cups of water and onto a high heat. The stock is brought to the boil and the heat is dropped immediately to a very slow simmer. This is to keep the stock from turning cloudy and to allow the bones enough time to infuse their flavor into the water before evaporation occurs.
When I was a chef in restaurants we would allow our stocks to cook over night at a super slow simmer. The heat would be increased in the morning by the morning crew and allowed to
simmer away until noon. This long, slow simmer extracted every bit of flavor out of the bones and prevented an accelerated evaporation of the valuable stock that was being produced.
The pan I am using for this is sort of half pan and half pot. It is perfect for just about everything, and here I use it to make our one pan dish.
The chicken breasts are butterflied and the tenders are pounded with a mallet. Since I am stuffing these breasts, I do this to ensure that the chicken will surround the filling completely. Once this is done the breasts are seasoned with salt and pepper.
The stuffing in this case is chopped spinach and onion. These are chopped finely, or minced, and seasoned with salt and pepper. This mixture is then placed on top of the breast and the fillet is laid over top. This gives me a top and a bottom to work with.
Now I transfer each breast onto a piece of plastic wrap. I then roll the sides of each breast up over the tender and wrap the whole breast up in the plastic wrap. This forms a sausage shaped package that is tied firmly at each end. This will give the chicken a nice shape when it is poached and will make for a nice presentation.
At this point I skimmed my stock. Sediment in the stock collects at the top of the stock and must be skimmed periodically. This yields a clearer stock.
I let the stock simmer for about an hour and then passed it through a strainer. I washed the pan and returned the hot stock to the pan. I then turned the heat up and brought it to a simmer.
While waiting for the stock to reach a simmer, I cleaned the vegetables for braising. I chose the vegetables for this dish based on the time of year and what was available in the farmer's market.
Carrots, kale, leeks, turnips, pearl onions and purple potatoes were what "popped" at me when I went to the market today. They made me think of fall and I thought they would make for a nice soft color combination for this dish.
After washing the vegetables, I pared them down to the desired shapes and sizes. I wanted this to be a rustic and comforting dish so I didn't cut them fine at all. They were all cut somewhat rough and country style.
Once the stock hit the simmer, I placed the wrapped breasts in and turned down the heat to a slow simmer. I poached the breasts for about 20 minutes and then removed them from the stock and allowed them to stand still wrapped while I braised the vegetables.
I braised the vegetables by putting them into the stock and allowing them to cook to the desired tenderness. The harder vegetables (carrot, turnips and pearl onions) went into the stock followed shortly after by the softer ones.
For two servings, I allowed for 3 potatoes, 4 baby carrots, 3 large kale leaves, 8 pearl onions, 1/4 leek, 2 scallions and about 1 cup of diced turnips.
I allowed the veggies to cook until a little past el dente. This is good for this dish.
Once the vegetables were cooked it was time to plate the dish! I unwrapped the chicken and sliced it on a bias. It's best to use the sharpest, thinnest knife you have for this in order to reduce drag. A thick knife, or a dull knife can make a mess of stuffed, delicate meats.
I then spooned the vegetables generously around the chicken. I finished off with a bit of braised red cabbage and beet for a touch of color.
This is a healthy, low fat meal fit for a queen. I served this to my kids tonight and I ate what they didn't finish. If I were to make it for myself, I would have omitted the potato to have a low carb meal. But the potatoes are a nice accompaniment if you are not concerned with that.
This is by no means a fancy dish and it is very easy to put together. If you wanted to sidestep the stock-making you could buy a good chicken broth as a substitute and your dish would great.
I wanted to show three things with this dish: how to stuff a breast of chicken, how to make a quick pan stock and how to make a one pan dish. I hope you learned a little something and you will try this dish sometime soon!
Friday, September 28, 2007
A HARVEST TIME FAVORITE
Well...it's just about here! Fall, that is. And with it comes the annual harvest of the last that the growing season has to give us. Thanksgiving makes us stop and think about that for about five seconds before we slice up that golden turkey and pour the wine. It's good to realize how tied to the earth and to what she gives us we really are, even if it's only once a year.
About two weeks ago I saw the pickers clean the orchards of
pears. The stone fruits were gone long ago. The pears were packed into massive bins, loaded onto trailers by tractors and hauled off to co-ops around the Okanagan. All that are left hanging now are apples.
To be honest with you, pears are not my favorite fruit. I like them very much, but they're not my favorite. They are down on the list a bit. But two things I absolutely love are pear jam and pear Tatin.
Tatin is traditionally made with apples; Granny Smiths to be exact. Tart Tatin is a super classic French tart served with creme friache. It's a killer dessert and dead easy to make. But the focus with this post is not Tart Tatin made with apples, it is Pear Tatin.
Pears work really well for this dessert even though they lack the tangy snap that Granny Smith apples do that makes Tart Tatin so good. Pears make up for this, however, by blending so well with the caramelized sugar and lending a distinct taste to the dessert. The spices and lemon juice in the following recipe give the pears a bit more backbone.
As mentioned, Tatin is simple to make and a guaranteed pleaser. Here's a recipe for Pear Tatin that you are sure to enjoy. Serve it with a dollop of sweetened whipped cream or some vanilla ice cream with a sprinkle of cinnamon.
Pastry Dough:
2 cups all-purpose flour
1/2 tsp. salt
1/2 cup plus 1 tbsp. chilled unsalted butter
6 tbsp. ice water
For the Pear Filling:
3 tbsp. unsalted butter
1/4 cup granulated sugar
3 or 4 firm, ripe Bosc pears (about 2 lb. total weight), peeled, halved and cored
1/2 cup firmly packed brown sugar
2 tbsp. finely chopped ginger
1 tbsp. lemon juice
1/2 tsp. ground mace
1/4 tsp. ground cinnamon
1/4 tsp. ground cloves
Instructions:
To Prepare the Pastry Dough:
In a bowl, stir together the flour and salt. Cut the butter into 1/2-inch chunks and add to the flour mixture. Using a pastry blender or 2 knives, cut in the butter until pea-sized pieces form. Add the ice water 1 tbsp. at a time, stirring lightly with a fork and then rubbing with your fingertips. Gather the dough into a ball, wrap it in plastic wrap and refrigerate for 15 minutes.
To Prepare the Pear Filling:
Preheat oven to 375 degrees F (190 C). Using 1 tbsp. of the butter, grease a 12-inch round baking dish with 2-inch sides, preferably of glass so you can watch the syrup forming. Sprinkle the sugar evenly over the dish bottom. Place the pears, cut sides up, in a tightly packed layer in the prepared baking dish. If necessary, slice a half lengthwise and use the slices to fill in any gaps between the halves. Sprinkle 1/4 cup of the brown sugar over the pears. Top with the crystallized ginger and the lemon juice. Cut the remaining 2 tbsp. butter into bits and dot the tops of the pears. Stir together the remaining 1/4 cup brown sugar and the mace, cinnamon and cloves. Sprinkle the mixture evenly over the pears.
To Assemble and Bake:
On a floured work surface, roll out the dough a little larger than the diameter of the baking dish and a scant 1/4 inch thick. Drape the pastry over the rolling pin and transfer it to the baking dish. Carefully undrape the pastry over the pears. Tuck the edges of the pastry down to the bottom of the dish to form an interior rim that will encircle the pears once the tart is turned out of the dish. Prick the top all over with a fork. Bake until the crust is golden brown, the pears are tender and a thickened, golden syrup has formed in the dish, about 1 hour.
Remove from the oven and let stand for 5 minutes. To unmold, run a knife around the inside edge of the baking dish to loosen the sides of the tart. Invert a platter on top of the baking dish and, using pot holders to hold the platter and the baking dish tightly together, flip them. Lift off the baking dish, gently removing any of the pears that may have stuck to the dish and repositioning them on the tart. Serve warm.
Yield: 6-8 servings.
Thursday, September 27, 2007
SOME PAST LOVES
This is a selection of some of the past plates I have put out as a chef. They represent a cross section of the work I did at many of the restaurants where I was employed as an executive chef. Some of the plates I look back on and cringe, while others I look at with a measure of satisfaction.
I've always tried to put all of my passion into every plate I created, and I can honestly say I accomplished this. While experimentation is a big part of being a chef, some ideas are better than others. At the end of the day I think all that matters is that we try our best.
I think the past is best left in the past; the future is where it's at! Personally...I have many good things to be happy about right now, and many more to come.
Here's to the future!
A NEW CHAPTER IN LIFE AND SOME KILLER SUSHI!
This July I took a trip to Toronto. While there, I was taken to many wonderful restaurants and had some really amazing food. One of my favorites was a Japanese restaurant called "Sushi and Bento" which is located at 187 Dundas Street. W. I have to say that I have eaten plenty of sushi in my time, but this was definitely the best I have had!
The chef worked away very quietly and unassumingly as he put out his highly artistic cuisine. His presentation was extremely colorful and abandoned the efficient simplicity to which most traditional thinking sushi chefs adhere. Being a black belt in Karate - a Japanese discipline - I have studied the Japanese culture somewhat and have grown to appreciate the directness and simplicity within it. It, in itself, is beautiful. But seeing this chef break free of those constraints and express himself so loudly on the plate was beautiful! The one characteristic he maintained that is common to every Japanese master was his humility. And it looked good on him too!
This is a very small restaurant (maybe 30 seats) and it is totally casual, but the food is something I would expect to see in a more upscale restaurant with a more formal vibe. We went there for lunch this one day and the place was packed. I imagine that dinner would be pretty much the same too.
We had the Sushi Pizza and the Hawiian Volcano Roll. Both were totally awesome and we were full when we were done. That's a good thing!
I am heading to Toronto again in a week and will be eating at Sushi and Bento while I am there. In fact, I'm getting hungry just thinking about it!
http://www.imhungry.ca/menus/SushiBentoMenu.pdf
BLAST FROM THE PAST
John was the man who encouraged me to write "Contemporary Brewhouse Cooking." He wrote the editorial wrap and I did the recipes. John has written several books and continues to write for various newspapers and magazines.
Behind me is a baker's rack chock full of breads, pastries and preserves made with beer.
This was a promotional shot taken for a Brewmaster's Dinner we held at the Inn.
Wednesday, September 26, 2007
A SAUCY LITTLE STEAK
This is a progressive preparation pictorial of a saucy little steak that went down the hatch with a nice glass of Merlot this evening. Notice that I served it (to myself) without starch or veggies. Why? Well...it was meant to be a low carb meal, of course! And sometimes you just feel like a piece of meat. Grrrrrr!
This is a rib eye steak - my favorite steak by far - and I tied it around its edge with twine so it would keep a nice round shape while grilling. I think it looks neater that way. I marinated it in some olive oil, minced garlic, minced shallot and fresh rosemary. Then I grilled it over smoking charcoal and basted it with olive oil and red wine as it cooked. Now that's love!
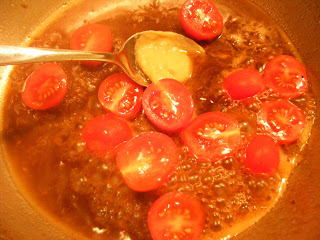
The pan sauce was made with 1 tsp butter, 1 TBSP minced shallot, 1/2 tsp minced garlic, 1 cup of Merlot, 1 TBSP beef essence, 1/2 tsp Dijon Mustard, 8 cherry tomatoes, 1 tsp chopped fresh rosemary, salt and fresh ground pepper.
I sizzled the butter in a hot pan until golden then hit it with the minced shallots and garlic. Just when I thought they were going to die of heat stroke, I cooled them off with the wine. Pshhhh! Then I watched as the wine slowly reduced, and when it was half gone, I added the essence of beef. I gave the pan a few swirls, and when everything was nice and happy...I added the
I served my steak with some goat's cheese on top which I warmed with a blow torch. The cheese goes quite well with the beef and the zesty acidic sauce. Yum!!
Here are the action packed photos of the entire sequence! And I have to tell you...it was good!!